Do you want to learn how to draw a peacock? Follow the instructions in the article and you will have a beautiful bird.
The most unusual and majestic bird on earth is the peacock. Thanks to their luxurious tail, they attract attention and fascinate. Many artists try to convey its splendor on their canvases.
We will also teach you how to draw a 3D illusion . Read detailed instructions in another article on our website . With the help of step-by-step explanations and interesting techniques, you will learn to draw a cat, banana, butterfly, heart, etc.
How to learn to draw a peacock? This article contains many instructions that will help you recreate this majestic bird on paper. Read on.
How to draw a peacock for beginners: drawing with pencil, paints step by step, instructions, photos
Do you want to learn how to draw a peacock?
Follow the instructions in the article and you will have a beautiful bird. The most unusual and majestic bird on earth is the peacock. Thanks to their luxurious tail, they attract attention and fascinate. Many artists try to convey its splendor on their canvases.
We will also teach you how to draw a 3D illusion. Read detailed instructions in another article on our website. With the help of step-by-step explanations and interesting techniques, you will learn to draw a cat, banana, butterfly, heart, etc.
How to learn to draw a peacock? This article contains many instructions that will help you recreate this majestic bird on paper. Read on.
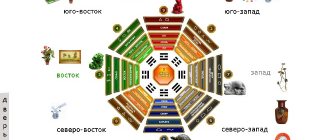
Where to hang the talisman?
The basic rules by which talismans are located prohibit hanging them above areas of rest, sleep, work or eating. It is not advisable to place wind chimes above people's heads, since the constant ringing of bells can be distracting and annoying.
The area in which we hang wind chimes is a long corridor with a lot of air currents, a door, a restroom. According to Feng Shui, we hang bells on windows from which negative energy elements are visible - the corners of buildings, a lonely tree or wires.
Peacock bird for beginners - pencil drawing step by step for a 6-7 year old child: instructions, video, photo
You can use the instructions for drawing a peacock together with your child. Armed with a simple pencil and a piece of album paper, you can begin to depict the bird. So, let's draw a peacock bird for beginners. Here is a pencil drawing step by step for a 6-7 year old child - instructions with photos:
Draw two circles
- Stage 1 will be a small sketch. To begin with, draw a circle - this is the head. Immediately below the circle, draw an oval in a horizontal direction. Divide the circle into two parts, connecting it with a perpendicular line to the oval.
- Stage 2. Using smooth lines, combine the circle and the oval to create a neck. Having thought about which side the bird’s wing will be on, mark it with two lines, imitating a leaf.
- Stage 3. On the opposite side of the wing, mark the pupil with a dot. Next, draw the eye itself. You can immediately add eyelashes. On the top of the head you can depict a crest in the form of a crown. 3-4 feathers will be enough. Don't forget about the beak. It should be sharp and curved.
Draw the crest, eyes and paws
- Stage 4. Paws. There is nothing complicated here; they can be depicted in the form of sticks arranged in a fan. But for the integrity of the composition, it is better to make them voluminous. To do this, draw three identical stripes vertically from top to bottom. Then connect them together with arcs. You will get real bird feet if you add claws to them.
- Stage 5. The most important. Imagine what scale the bird's tail will be, and from the line of the body, make two marks for the width of the tail, drawing arcs in different directions. By connecting them in a semicircle, we get a tail fan. Now it should be divided into sectors. They start from the point where the arcs connect and end in the middle of the tail.
Draw a fan and divide it into sectors - this is the tail
- And then use your imagination to decorate with various patterns.
- Diamonds, swirls, circles or intricate patterns will complement the design.
- Now you can color the peacock. Take a blue pencil and color the torso.
- Paint the face with pink, orange and yellow.
Peacock bird for beginners - pencil drawing
- Continue decorating the bird using other colors and shades of pencils.
At the end, trace the outline of the peacock with a black pen and you’re done. Look how beautiful it turned out. Below you will find several more options on how to draw a peacock, and photo instructions will help you.
Instructions on how to draw a peacock Instructions on how to draw a peacock Instructions on how to draw a peacock Instructions on how to draw a peacock Instructions on how to draw a peacock
Here is a video that describes in detail how to draw such a beautiful bird:
Creative materials
Drawing requires concentration from the master, but at the same time, it is an exclusively creative activity. For the artist, it is necessary to prepare an optimal place with a wide table or easel, a chair and an organizer. The following materials will also be useful:
- A set of simple pencils.
- Colored pencils or felt-tip pens that will allow you to add color to the bright bird in the drawing.
- Eraser.
- Some drawing techniques will require a compass.
Of course, don’t forget about white paper and a photo of a real peacock, which will help the master navigate the creative process.
How to easily, simply and beautifully draw a peacock with paints, gouache yourself: instructions with photos
If the previous option was easy, then you can start drawing the peacock in watercolor or gouache. First, remember the color of this marvelous bird. She has quite bright plumage. How to easily, simply and beautifully draw a peacock with paints or gouache? Here are the instructions with photos:
Arm yourself with blue, green, red shades. Don't forget the whitewash. A sheet of paper, brushes of different sizes, a palette and a napkin will help you. Now you can start creating a masterpiece:
How to draw a peacock with paints: make the background and body
- First, sketch out a light sketch of the future bird on a piece of paper.
- Designate the background on which the peacock will show off. This is important - the saturation of the plumage of the character being drawn depends on the background.
- Take bright green paint, preferably a grassy shade. Using a flat brush, tightly fill in the areas freed from the sketch from the outside.
- Blue azure gouache will be needed to paint the body. Use a tone an order of magnitude darker along the edges, and lighten the center with white paint.
- Leave an area on your head that is not filled with paint. Then mix blue and white in the palette. With this mixture, begin to lighten the abdomen, crown and part of the neck.
- Apply a lighter layer on top of these layers and blend to create a gradient.
Draw the details
- At this stage, use a thin brush. Using it and white paint, paint over the empty spaces on the muzzle and outline the eye.
- Place a small dot inside with green paint. Shade the remaining white islands with blue.
Using strokes draw the tail
- It's time to draw the tail. It will be open and colorful.
- Using a wide, sparse brush, apply strokes over the green layer.
- Then do the same manipulations using lemon, bluish and dark blue shades. Add a few strokes to the tail, shading the white and light green.
Draw the details of the tail
- Draw small fibers on the top of the head. This will be a tuft. Sprinkle dots on the ends and paint with white splashes.
- Using the same brush, after washing it first, paint the feathers on the right in green. Draw them in waves along the sheet and to the end. Tint with lemon paint, creating transitions.
Peacock is ready
- Design the pen nibs like this: place blue circles around the entire perimeter in a chaotic order, and then, as if drawing a halo, outline them in blue. The circles should look large.
- For splendor, add yellow and a little red.
Now you know how to draw a peacock with paints. It turns out spectacular and truly beautiful. Thanks to the instructions described above, you realized that the most important thing is to be able to draw a peacock's tail. Let's practice again. Read on.
Drawing with paints
An original solution when depicting a peacock with paints is to use the entire album sheet, like a peacock’s tail. In this case you will need:
- Draw with a pencil the elongated neck, head and chest of the peacock to the left or right relative to the center of the face.
- Draw the details - beak, eyes on the head. This can be done in white or light beige.
- Behind the neck, draw the base of the tail - the technique of drawing it is similar to the scales of a fish. Draw diagonal straight lines in different directions from the base of the tail.
When coloring, make the base of the tail in green or yellowish tones, the tail itself blue-green, and the body deep blue or dark blue.
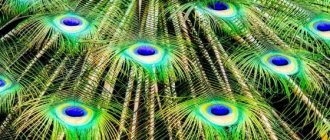
How to beautifully draw a peacock feather: instructions step by step
Peacock feather
If the task is to draw a separate element, for example, a feather, then first you should study the original image. The photo above shows a real feather from this bird. It's easy to draw. How to draw a peacock feather beautifully? Here are the instructions step by step:
Draw an oval, then inside there is another oval with a notch
- Draw a diagonal - the base of the pen. At the end of the line, draw a shape similar to an egg. Inside it there is an internal outline in the form of an oval, then an even smaller one with a notch.
Draw some fibers near the oval
- From the main oval, draw grooves resembling bristles, and long hairs on top, continuing to draw them to the stem. Closer to the oval, fill the space tightly with lines.
Continue drawing fibers along the entire stem of the feather
- Color the beautiful part of the feather with azure and green colors, highlighting the eye with a notch in a dark color. You can add ocher to show shimmer.
Draw the fibers more clearly with pencil and paints
- Feather fibers can be highlighted with thin strokes of black paint.
As you can see, everything is simple. Just follow the instructions and you will be able to draw such a beautiful feather.
How not to make a mistake with your choice
It is believed that Chinese bells, when placed and used correctly, are capable of transforming subtle energy flows. Today, to make “wind chimes”, they use metal, wood and porcelain, complementing the composition with all kinds of decorations and figurines.
In most cases, a wooden air bell is an original work and is made from bamboo. Craftsmen determine the sound note by lightly tapping a bamboo stick and accurately select the required set of other parts for the amulet. Thanks to this, the bells produce beautiful and harmonious sounds.
We have selected interesting articles for you:
The most powerful runes to attract unconditional love
The meaning of the Valkyrie amulet - an ancient symbol of warriors
The choice of model will depend on the result that the person purchasing the talisman wants to get. If a family is moving into a new home, it would be a good idea to find out the history of its former inhabitants. It is possible that they could leave behind a lot of negative energy if, for example, a person there recently died or was sick. To get rid of negativity, you should pick up a “singing bowl” or “wind chime” and walk around the apartment three times clockwise.
When buying, you need to listen to how the bells sound. If the sound turns out to be pleasant to the ear, then the talisman is likely to be a good assistant to the owner in various life situations.
How to quickly draw a peacock with your hand on paper?
Drawing a peacock with your hand
For the youngest artists, the technique of drawing a bird with your palms is suitable. This interesting practice will turn into a game. How to quickly draw a peacock with your hand on paper? Here are the instructions:
- Paint your palm with the colors described earlier.
- You can paint each finger a different color and diversify it with elements based on the already dried paint.
- Draw the outlines of the body, feather hairs, eyes and beak with a black felt-tip pen.
More details:
- Paint your palm green.
- Cover your thumb with blue.
- The index finger will be purple.
- Paint the remaining fingers blue.
Drawing a peacock with your hand
Place your painted palm on a piece of paper. You immediately get a colorful bird. To make the tail fuller, you can apply the palm several times, adding yellow and white shades. Then add the eyes, paws, beak, and curls of feathers. You can draw this bird using your palm like this:
Drawing a peacock with your hand
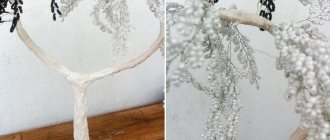
Bell from a cup
There are many options for making souvenir bells. One of the most interesting ways to make a bell with your own hands for September 1 is to use a ready-made small bell souvenir and a beautiful tea cup with a handle.
Craft materials
We tie a thin cord to the bell.
We tie a string to the bell
Glue its tip to the bottom of the cup from the inside.
Glue the lace to the bottom
From the outside, we glue a cord more tightly to the bottom, from which the bowl will be suspended.
We tie the lace on the outside with a bright wide satin ribbon.
Attach a ribbon bow
Bell from a cup
This bell will do a good job of ringing the first bell of the school year.
How to draw a little peacock kwami from Lady Bug, the peacock mascot: step by step
Little kwami peacock from Ladybug
Favorite cartoon of many children. Surely, your kid asked to draw one of the kwami. How to draw a little peacock from Lady Bug? Here are the instructions step by step:
- In the center of the sheet, outline the head from a circle with convex cheeks on the sides.
- Just below, draw an oblong body in the form of an oval, connecting it to the head with two lines, this will be the neck.
- Draw the handles on both sides with oblong lines from the neck to the end of the body.
- The legs consist of two elongated ovals; the feet are formed of two circles.
- The eyes should be made large and teardrop-shaped. Inside, mark the pupils with arcs, and draw two elongated diamonds in the center. Add a mouth and draw a thick dot on the forehead.
- The tail consists of five drops from the central part, with two more feathers on the sides.
- Inside, decorate each feather, paying attention to the original image.
You can start coloring the character. Now we draw the peacock kwami mascot from this cartoon:
Little kwami peacock from Ladybug - mascot
To draw a talisman quickly and easily, use a protractor:
- Trace it completely on paper.
- According to the plot, the artifact has nine segments, so the semicircle will have to be divided into 9 identical parts every 20°. You can also draw a smaller number, for example, 7. Then make a larger indent - 25-30° each.
- Draw lines from the central point along the bottom line to the points of the segments to create rays.
- Draw arcs along the top edge from one point to another, thus creating a tail fan.
- In place of the central point, draw a small drop, with another smaller one in it.
- In each sector of the tail, draw ovals on top.
- Now you can start coloring, using the color image of the mascot.
- Draw the body and legs as ovals.
- Draw the head according to the instructions above.
Don't forget to draw a crest. Ready.
The history of the talisman
Ancient scientists of the Celestial Empire believed that wind chimes could bring harmony to the house and create a favorable living environment. A bell pendant was hung in the place where it was necessary to improve family relationships, stabilize financial affairs and increase the flow of Qi energy. This scheme was applied even in relation to state rulers: harmony had to be properly adjusted so that the management of the people was carried out in the right direction, there was no poverty, uprisings and natural disasters. In the same way, “wind music” worked in any family.
The Chinese have a legend about a sage who wanted to give people the voice of the wind by sealing it in bamboo stems. To do this, he appealed to the Spirit of the Winds, asking him to sing his most beautiful song. The spirit did not agree at first, but, having learned that air is an element without which people cannot live even a minute, it sang beautifully and drawn-out. The sage immediately caught his voice in bamboo sticks. Returning home, he made talismans and gave them to people, who from then on could enjoy music at any time and were reliably protected from the negative energy of Sha.
Peacock craft: what can it be made from?
Peacock craft
Crafts in the form of a peacock with an open tail can be made from various materials, cardboard, plasticine, plastic bottles, wire, etc. What else can be made from? One of the simple ways to do the work with your child is to make an applique from colored paper. Here are the instructions:
Glue the strips like this
- Cut the entire green leaf into thin strips.
- Glue the ends of the strips together.
- Take a thick sheet for the background of any light shade.
- Mark a dot at the bottom center. Glue the loops obtained from the strips from it in a circle. It should look like a fan.
Now glue the paws
- At the bottom of the fan, glue the legs made of yellow paper. Draw and cut them out first.
- For the body, use blue paper.
Glue the peacock's body
- Cut out a small circle for the head and an oval-shaped body.
- Use orange paper to make the beak into a triangle.
The peacock craft is ready
- Combine everything into one composition in the center, don’t forget to finish the eyes and glue on the beak from yellow paper.
Look what an interesting craft it turned out to be.
Wind chimes: do it yourself (video)
Original product made from a plastic pot and lids
If you have bottle caps and a plastic flower pot in your house (and everyone has one), then you can quickly, literally within half an hour, make a musical accessory with your own hands, and it will not only be cute and effective, but also make original sounds in the wind.
The production process is quite simple, and to complete it you will need only 30 minutes of time, 5-6 pieces of strong thread or fishing line, 50 cm long, several dozen bottle caps, as well as a plastic flower pot and a piece of string for hanging. First of all, punch holes evenly in the pot, upside down, around the entire circumference, for 4-5-6 or more pieces of fishing line that you have prepared. Next, sequentially put bottle caps on the thread or fishing line (in which there are already holes made with a needle or awl), 2-3 cm apart, or even more chaotically. To prevent the lids from slipping, we tie knots on both sides of each of them. Now that a certain number of threads with caps are ready, carefully thread them through the holes in the plastic flower pot and tie them. On the other side of the pot we make a suspension, for example, from twine.
That's it, the wind chime is ready, but you can always get a little more creative, for example, by hanging beads and bells on the edges of the fishing line with caps.
Making wind chimes from bells and shells
All that is needed to create the next talisman is a small dry and strong twig, shells, bells and threads. Next, everything is done in exactly the same way as in the production of an accessory from keys, only you don’t need to paint anything, and on each strong thread we put not a key, but sequentially shells and bells, or in any other order convenient for you.
The result is a magnificent talisman, which can only be distinguished from a store-bought one by quality, since a self-made product often turns out much better than store-bought stamps.
Peacock: pictures drawn for sketching
Now you can draw a peacock and even make crafts of this bird. To learn how to write beautifully on canvas, you need to practice as much as possible. Here are pictures of a peacock drawn for sketching:
Peacock: pictures drawn for sketching Peacock: pictures drawn for sketching Peacock: pictures drawn for sketching Peacock: pictures drawn for sketching Peacock: pictures drawn for sketching Peacock: pictures drawn for sketching Peacock: pictures drawn for sketching Peacock : pictures drawn for sketching Peacock: pictures drawn for sketching Peacock: pictures drawn for sketching Peacock: pictures drawn for sketching